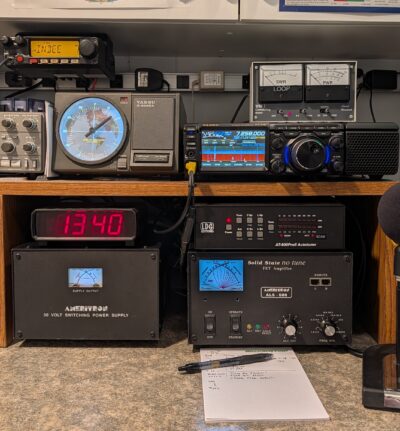
Blitzortung

I’m a weather nerd. I like all things weather related. Around 10 years ago I ran across an interesting project to track lightning strikes around the world. Blitzortung.

Blitzortung is a community-based lighting detection network that uses Time of Arrival (TOA) and Time of Group Arrival methods to locate lightning strikes. It relies on a network of distributed, low-cost receiver stations, run and assembled by volunteers, to detect VLF radio waves emitted by lightning. By measuring the time it takes for these signals to arrive at different stations, the system can triangulate the strikes location.

I won’t go into great detail here on how it works, as you can find that information on the Blitzortung project pages. What I will show here is a little about my receiving station.

My station is a “System Red” PCB 10.4 detector. I purchased it as a kit and assembled it. I had to build my own antennas. You can find out a ton more information about the receiver and how it all works at the System Red link.

I chose to use Ferrite Rod antennas for my application. I wound the antenna on ferrite rods, shoved them inside a piece of 1/2″ PEX tubing, then wrapped them in copper tape with a 2mm slit to provide shielding. That all get put into a 3/4″ PVC pipe to weather proof the elements. There are two of these antennas, one is mounted vertically and one horizontally.

One of the ferrite antenna elements.
Antenna after insertion in PEX tubing and wrapping it with the copper shielding tape.
The completed antenna and the outdoor amplifier board.

I attached the completed antenna to my privacy fence in the backyard. Shielded CAT5 Ethernet cable connects the amplifier to the main controller. I also mounted the necessary GPS antenna outdoors.

Inside is the Main Controller, mounted to a wall in my basement.

The “System Red” controller.

It all works surprisingly well, though it does suffer from some interference. The spot on the fence seems to be one of the quieter spots. Mounting it on the side of the house was a lot worse interference wise.

This isn’t a simple build it and it will work setup. You have to be willing to tweak antennas and locations to find the “best” spot for the antennas.

System Red is long since discontinued, but is still supported by the network, and was replaced by System Blue, but I believe these are sold out.

Blitzortung is run completely by hobbyists, so their resources are a bit limited. In addition to making and selling the kits they also have to operate the servers that aggregate the data and calculate the lightning locations. They make the data freely available at www.lightningmaps.org. If you use their data please consider a donation to keep things running.

The Joys of Amateur Radio: How This Hobby Can Enrich Your Life

Are you looking for a new hobby that can bring you excitement, challenge, and a sense of community? Look no further than amateur radio! Amateur radio, also known as ham radio, is a fun and rewarding hobby that can provide endless opportunities for communication, learning, and adventure.

As an amateur radio operator, you’ll have the chance to communicate with people from all over the world, sharing stories, learning about different cultures, and making new friends. You’ll be able to participate in nets, which are regular meetings of amateur radio operators, and take part in contests and other events. Plus, you’ll be able to use your skills to help out in emergency situations, such as natural disasters or public service events.

But amateur radio is more than just communication – it’s also a great way to learn about science, technology, engineering, and math (STEM). You’ll be able to learn about the physics of radio waves, the electronics of transmitters and receivers, and the software used in modern radio systems. And with the rise of digital communications, you’ll be able to experiment with new technologies like satellites, software-defined radios, and more.

In addition to the technical aspects of amateur radio, there’s also a strong social aspect to the hobby. You’ll be able to connect with other amateur radio operators in your local community or around the world, sharing experiences, swapping stories, and learning from each other. Many amateur radio clubs and organizations host events, field days, and other activities that bring people together and foster a sense of camaraderie.

So why not give amateur radio a try? It’s a hobby that can be enjoyed by people of all ages and skill levels, from beginners to experts. With the right equipment and some basic knowledge, you can start enjoying the joys of amateur radio today. Plus, many organizations offer training and resources to help you get started.

In conclusion, amateur radio is a wonderful hobby that can provide endless opportunities for communication, learning, and adventure. Whether you’re interested in making new friends, expanding your knowledge of science and technology, or just having fun, amateur radio has something to offer everyone. So why wait? Join the thousands of amateur radio operators around the world and start enjoying this exciting hobby today!

(This post was created using AI)

Rediscovering the Magic of Ham Radio

Hello fellow ham radio enthusiasts!

It’s been a while since I’ve taken the time to sit down and write about my passion for ham radio. Life has a way of getting in the way, and over the past year, I found myself taking a break from the hobby. However, I am happy to say that I am now eager to get back on the airwaves and rediscover the magic of ham radio.

For those who may not know, ham radio is a hobby that allows radio enthusiasts to communicate with others around the world using voice, digital modes, and even morse code. Whether you are interested in making new contacts, participating in contests, or simply chatting with friends, ham radio has something for everyone.

Over the past year, I have missed the thrill of making new contacts, the excitement of participating in contests, and the camaraderie that comes with being part of the ham radio community. I am now eager to jump back in and see what’s new in the world of ham radio.

So, if you hear me on the airwaves, don’t be afraid to say hello. I’ a’m looking forward to making new contacts, chatting with old friends, and rediscovering the magic of ham radio.

(I've also been too lazy to post here, so I asked ChatGPT to write this post).

73,

W0HC

Building a Wi-Fi NTP Clock

I had been wanting a nice digital UTC clock for my hamshack. In particular one that could set itself to an NTP server over the internet to maintain precise time. But I was having trouble finding a WiFi NTP clock at a price I was willing to pay. Most of the ones I was finding online were $200 or more. So what’s a ham to do? Build your own!

After a lot of searching for what I wanted, I ran across this project (see notes at end of post) over at Adafruit, and seemed like it just might fit the bill. And it did.

I used a Raspberry Pi Zero W as the brains, and the Adafruit 1.2″ 4-Digit 7-Segment Display w/I2C Backpack for the display. I followed the rest of the tutorial and it worked great.

After trying it for some time I was happy with it, and found a Polycase enclosure that was almost the right size. At least for the 7-segment display itself. With it soldered to the backpack it was way too tall. So why not run it remotely from the backpack board? Using some jumper wires I did just that, and with only some minor Dremeling to the enclosure to make it fit perfectly.

Wifi NTP clock internal image

I used some red plexiglass on the front and it looks great in the shack. And it’s a bonus that the time is always correct. Just be sure that when you configure the Pi you set it to use UTC time.

Finished WiFi NTP Clock
The finished LED Wifi NTP Clock

All together I spent around $60 to build this clock.

NOTES:
Before pip3 command can be run, you need to do this:
sudo apt-get install python3-pip
You also need to run the pip3 commands as sudo.

It appears the github content for this project has gone 404, so you may have to create the python code files yourself.

You also will have to set the program to run as a service and should consider ways to extend the life of the SD card by reducing writes.

French Toast Alerts

For several years I’ve been posting my “French Toast Alerts” on my Facebook timeline. But where did the idea come from?

Well, for starters, working at a grocery store in high school I noticed that any time snow was predicted, certain items seemed to become very fast sellers. Namely, bread, milk, and eggs. What the heck is going on? Are people planning to make French Toast if they get stuck at home??

Fast forward a couple decades and I ran across a Twitter account that was posting “French Toast Alerts”, so I asked if I could steal the idea, he referred me to the original source of these, Universal Hub in Boston. so I reached out to them to see if they minded. They said by all means, have fun with the idea. And so I have had fun with it.

And now when winter weather threatens Eastern Iowa I will often post this nonsense on my Facebook. Sometime I forget, or don’t even realize snow is coming, and stupidly enough someone will reach out to me to see if a French Toast Alert is warranted. So I guess I’ll keep posting them.

10m Calling Frequencies

I found this list on the Heartland 10mtr and 6mtr and 12mtr group AM/FM/SSB/digital modes Facebook group. It looked like something I could use again so I’m posting it here.

28.025 CW Rare DX & DXpeditions Frequently Operate Here — Split
28070.15 PSK-31 (offset -115 for USB)
28.080 RTTY Rare DX & DXpeditions Frequently Operate Here — Split
28.1010 10/10 Intl CW Calling Frequency
28120.150 — PSK31
28.120-28.300 Beacons
28.380 10/10 SSB Intl Calling Frequency
28.425 10/10 SSB Intl Calling Frequency
28.495 SSB Rare DX & DXpeditions Frequently Operate Here — Split
28.600 Old General Callin Frequency – Still used by Old Timers
28.675~28.685 SSTV Operating Frequency — IARU Region 1
28.680 SSTV Operations USA/Canada
28.825 10-10 Backskatter Net – Paper Chasers Net
28.885 6M DX Liaison Frequency — Listen here for 6 Meter DX opening announcements and discussions.
28.945 FAX Operating Frequency
29.000-29.200 AM Operations
29.300-29.510 Satellite Downlinks
29.520-29.580 Repeater Inputs
29.600 FM Simplex – Calling Frequency
29.620-29.680 Repeater Outputs

Weather

I’ve always been a self described “Weather Geek”. In fact, weather spotting was one of the reasons I became interested in amateur radio as a teenager.

I’ve been a National Weather Service trained spotter since 1995.

I’ve been uploading data to Weather Underground since 2006. The first station was located on top of Independence Fire, and was a Peet Bros Ultimeter 2100. Sadly, it didn’t last long due to the computer it was connected to being destroyed by lightning. The a radio maintenance company claimed to have found the anemometer in pieces on the rooftop. It was fine a few days before that so I’m not sure what happened.

Later I obtained a Davis Instruments Vantage Pro 2 (wired version), which is now residing at the W0HC QTH. The anemometer is installed at 30′ on my tower, and the rain gauge and thermometer are at about 10′.

The data is captured via USB by a Raspberry Pi running WeeWx. From there it is uploaded to Weather Underground and APRS.

Pork Belly Burnt Ends

Our local Fareway grocery store had ordered some pork belly for a customer, and had some left over, so I decided to try smoking some. My original plan was to make bacon, but I got up one day and the weather was perfect to sit outside smoking meat, and I hadn’t cured my pork belly (which takes 7-10 days) so I decided on Pork Belly Burnt Ends.

I started with 1/2 of a pork belly (about 7lbs) with the skin removed. There’s a lot of fat on pork belly, and you want to leave a fair amount, but trim away some excess. I probably had over a pound of fat that I removed.

  • Trim excess fat
  • cut the meat into 1 1/2 to 2 inch cubes.
  •  apply Extra Virgin Olive Oil (enough to coat the meat) and your favorite dry rub (if you don’t have a favorite I recommend making up some Raichlen’s Rub #2) – Be generous (use about 1 cup of dry rub for 5 lbs of meat).
  • Smoke for three hours at 225-250 degrees or until you like the color of the meat. A nice bark will form starting around the three hour mark.
  • Next, add the cubes to a pan (we like a heat-proof disposable pan). Into the pan add the braising liquid. We use BBQ sauce to really add that extra flavor (about 1 cup), 3-4 tablespoons of butter, which adds richness and acts as a fatty binding agent for bringing the sauce and honey together, and then 2 tablespoons of honey (or agave) to bring a stickiness and sweet characteristic. Then mix them all together
  • Then cover and braise in smoker for another 60 – 90 minutes. You will find that the liquid braises at or near a boil and that the fat renders down in the burnt ends keeping the pan moist.  Again, you have added additional fat in the butter, the honey as a binder and the sauce for flavor to really render out the fat that is in the pork belly.
  • Finally, remove the foil pan cover and cook for another 15 minutes to let the heat tack up that sauce,
Sauce:
  • 1 cup BBQ sauce
  • 3 tablespoons unsalted butter
  • 2 tablespoon honey

Notes:

I smoked these for 3.5 hours at 235°F using Apple wood in my Masterbuilt electric smoker. I then followed that up on the Weber Kettle charcoal grill using Kingsford charcoal with some apple wood chips thrown on top over indirect heat for 30-40 minutes to get a better bark on them. I then sauced them up and braised them on the Weber gas grill (mainly because I could control the temperature better than on the charcoal grill) for 45 minutes at 250° before removing the cover to tack them up.

This recipe is based on one I found here: http://www.vindulge.com/2017/05/smoked-pork-belly-burnt-ends-recipe-and-video/

On the workbench – Vintage RCA portable TV

RCA 8-PT-7030 Portable Television

Years ago I picked up this old RCA portable television, model 8-PT-7030 manufactured in 1956. Someone on the rec.antiques.radio+phono Usenet group was giving it away for the cost of shipping, which was around $30. At the time it had a broken high voltage rectifier tube. Other than that, I was unsure of it operating condition. It sat around for close to 10 years.

The first thing I needed was a schematic, and at the time I was unable to locate one online. It occurred to me that my friend Mel W0MDM might have one at his TV repair shop in Estherville. The next time I was passing though I stopped to sell hello and see if he had schematics, and sure enough, he did.

The first problem I ran into in the repair process was a lot of melted wax on the back of the rectifier tube socket, which had migrated into the socket itself. I’m not sure if this wax melts out of the high voltage transformer, or if it’s there to prevent arcing. Either way, it had made a bit of a mess. I tried picking the wax out with some dental picks, but wasn’t entirely successful. I got busy with work so the set got put on the shelf in the backroom for the next 10 years or so.

Last month I dug it out and decided to see if I could make it work. I used my hot air soldering station to blow the wax out of the tube socket and replaced the bad tube. The set still didn’t turn on.

I was able to find a full service manual for the set, a copy of which I have uploaded here. This was very helpful, as it allowed me to discover that the chassis comes apart into two halves for easier service.

I don’t have a tube tester, so I’m not able to check any of the tubes. I also didn’t have a cord that would allow me to power it up on the bench with the cabinet removed. I could have rigged up a “suicide cord” to power it, but I decided against it. At a minimum the set needs the selenium rectifiers and the electrolytic filter caps replaced. And then there’s an almost 100% chance that some or all of the 31 wax/paper capacitors are bad. Five of those are not available in the correct values and voltages. The available parts would cost around $55, but still no guarantee that all 16 tubes are good. Or that the CRT is good.

While this would be a fun project, I decided to just clean it up as a display piece for now. Even if it worked, there’s no analog signals left to display so I would have to feed this with an RF modulator to get a picture. It would look pretty neat in my basement bar, but even not working it will make a nice display piece.

The chassis removed from the cabinet


Hamfest Find – Vintage Bearcat III Scanner

When I was kid my grandma always had a police scanner going. My brother and I thought it was pretty neat to hear the police, firemen, and ambulance talking. I can’t remember exactly which radio she had, but I do remember that it was a Bearcat, and that it had the red LEDs and there were lockout switches for each channel.

Later on when I was in high school I bought my own police scanner, a Bearcat BC70xlt. Two of the channels I had programmed were local 2m ham radio repeaters. Not having a ham radio license, my brother and I both put CB radios in our cars, as did many of my friends. We had a lot of fun with those CBs, but they sure left a lot to be desired.

We noticed that one of the kids at our high school had a lot of antennas on his car, so one day I asked about them. It turns out that he was a ham, and he told me I needed to throw away that CB and get a ham radio license, which I eventually did. That kid turned out to be a lifelong friend, we still chat on Facebook several times a week.

Fast forward 25 or so years later and I ran across this old Electra Bearcat III police scanner at the Cedar Rapids hamfest. It immediately reminded me of my grandma, and how her police scanner changed my life by sparking an interest in radio communications. The guy was asking $10 for it, with the original box, manual, power cord, and mobile mounting bracket. How could I pass that up?

The radio was in mint condition inside and out. No dust bunnies and very clean. The only real cleaning it needed were the knobs, which I scrubbed with a toothbrush and some Simple Green. A quick wipe down of the rest of the radio and looked great.

Of course, this being a crystal set, I knew it wasn’t going to hear any of the channels our local public safety agencies were using. Even worse, once I got it home I realized that the BC3 used optional IF boards to listen to two different bands. This radio only had one installed, and it was UHF, and I needed VHF. But I found another BC3 on eBay for a bit over $15 shipped, so I went ahead and ordered it so I could rob the IF board from it. It even had a couple of crystals that would work for me locally.

Next I needed crystals. Certainly ICM or Jan would have them. Nope. Both are out of business. Looks like it was back to eBay. Several sellers had scanner crystals, and I finally found a seller that had what I needed. I ordered five crystals for $50 shipped, a lot more than I really wanted to pay, but what good was this thing without the crystals? Once they arrived I installed them and sure enough, I heard the fire department being paged out and the police dispatcher as well.

I put the scanner on the bench and tested with an IFR-1100 service monitor and the receiver is actually quite hot, at about 0.2uV of sensitivity. Not bad for a scanner that’s nearly 40 years old! I considered re-capping it, but since it was working just fine I decided not to bother.

This unit is now living in my basement bar, right next to some 70s vintage pinball machines. It looks right at home there, and every time I see it I can picture grandmas scanner on top of her refrigerator, and I’m reminded of childhood visits to grandma and grandpas house.

w0hc.com is licensed under Attribution-NonCommercial-ShareAlike 4.0 International